Getting Started
Basic setup
Out of the box Fluidity works using PetaPoco as the persistence layer as this is what ships with Umbraco. However, it is possible to use a custom Repository if you prefer. For the sake of getting started, we’ll assume you are using this default strategy.
Start by setting up a database table for your model (you might want to populate it with some dummy data as well whilst learning). We’ll use the following as an example:
CREATE TABLE [Person] (
    [Id] int IDENTITY (1,1) NOT NULL,
    [Name] nvarchar(255) NOT NULL,
    [JobTitle] nvarchar(255) NOT NULL,
    [Email] nvarchar(255) NOT NULL,
    [Telephone] nvarchar(255) NOT NULL,
    [Age] int NOT NULL,
    [Avatar] nvarchar(255) NOT NULL
);
Then, create the associated poco model:
[TableName("Person")]
[PrimaryKey("Id")]
public class Person
{
    [PrimaryKeyColumn]
    public int Id { get; set; }
    public string Name { get; set; }
    public string JobTitle { get; set; }
    public string Email { get; set; }
    public string Telephone { get; set; }
    public int Age { get; set; }
    public string Avatar { get; set; }
}
With the database and model setup, we can now start to configure Fluidity itself. The entry point for a Fluidity configuration is via a class that inherits from the abstract base class FluidityConfigModule. This class exposes a single method, Configure, which is passed a FluidityConfig instance. It is against this instance that you configure your UI.
public class FluidityBootstrap : FluidityConfigModule
{
    public override void Configure (FluidityConfig  config)
    {
        // Your configuration goes here...
    }
}
An example of a basic configuration for our model might look something like this
public class FluidityBootstrap : FluidityConfigModule
{
    public override void Configure (FluidityConfig  config)
    {
        config.AddSection("Database", "icon-server-alt", sectionConfig => {

            sectionConfig.SetTree("Database", treeConfig => {

                treeConfig.AddCollection<Person>(p => p.Id, "Person", "People", "A collection of people", "icon-umb-users", "icon-umb-users", collectionConfig => {

                    collectionConfig.SetNameProperty(p => p.Name);
                    collectionConfig.SetViewMode(FluidityViewMode.List);

                    collectionConfig.ListView(listViewConfig => {
                        listViewConfig.AddField(p => p.JobTitle);
                        listViewConfig.AddField(p => p.Email);
                    });

                    collectionConfig.Editor(editorConfig => {

                        editorConfig.AddTab("General", tabConfig => {
                            tabConfig.AddField(p => p.JobTitle).MakeRequired();
                            tabConfig.AddField(p => p.Email).SetValidationRegex("[a-zA-Z0-9_.+-]+@[a-zA-Z0-9-]+.[a-zA-Z0-9-.]+");
                            tabConfig.AddField(p => p.Telephone).SetDescription("inc area code");
                            tabConfig.AddField(p => p.Age);
                        });

                        editorConfig.AddTab("Media", tabConfig => {
                            tabConfig.AddField(p => p.Avatar).SetDataType("Upload");
                        });

                    });

                });

            });

        });
    }
}
Which in turn will generate a fully working user interface like this *
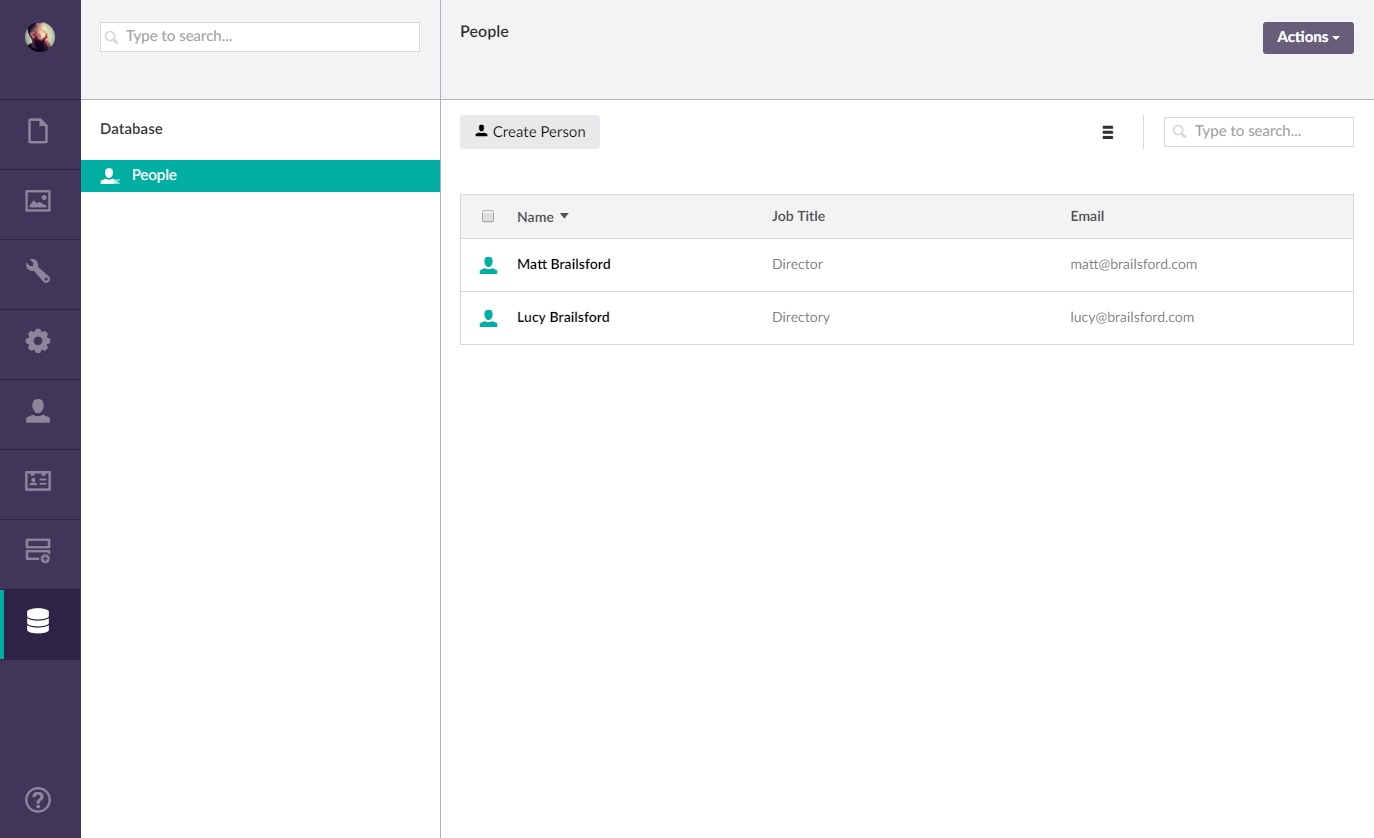
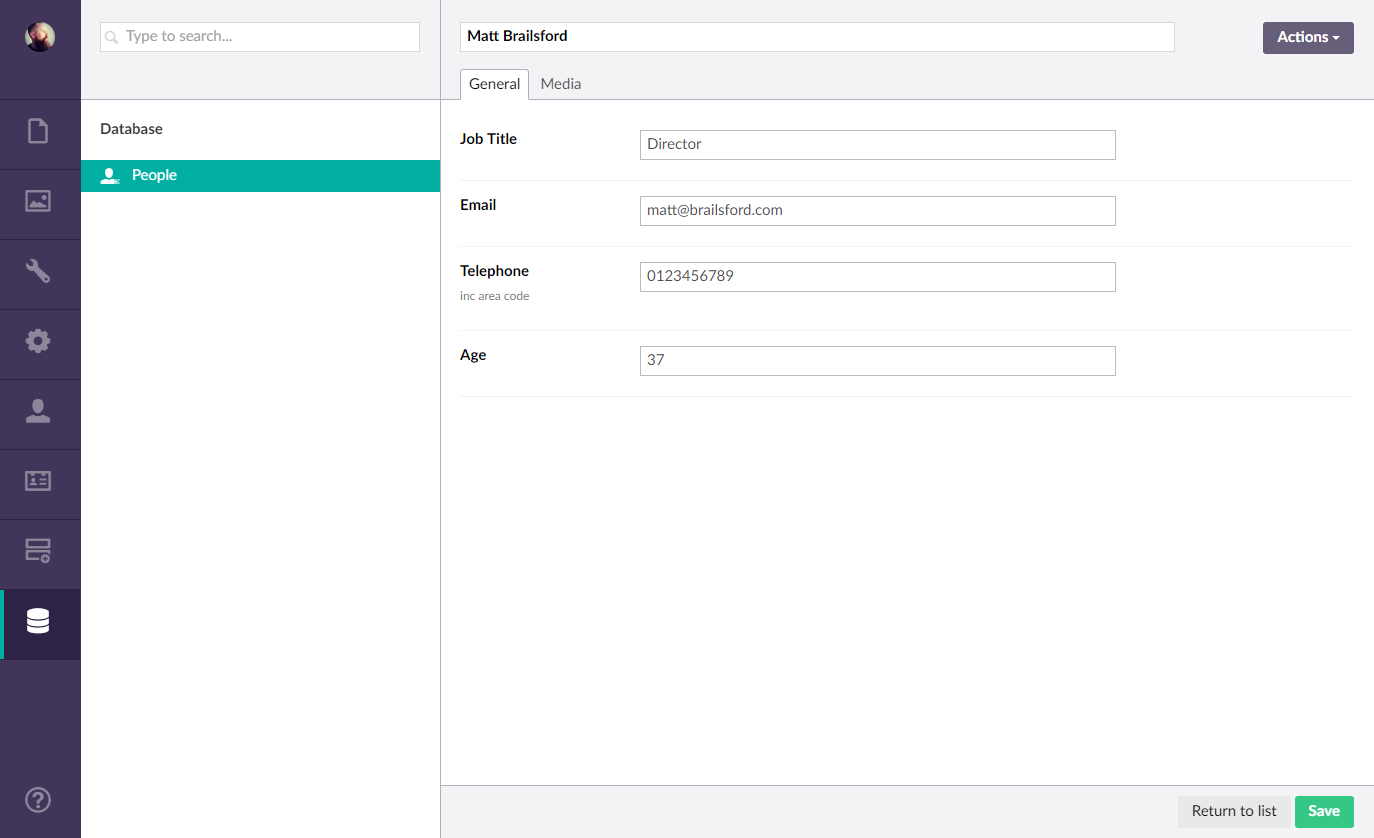
As you can see, with very little code you can start to create very powerful interfaces for your custom models.
To see all the possible configuration options for each of the UI components, be sure to read through the API documentation.
* If following this as an example, and you don’t see your section being displayed, be sure to read the AddSection documentation regarding giving your active user the relevant permissions